Headwall vs Sidewall Flashing: How to Tell Them Apart
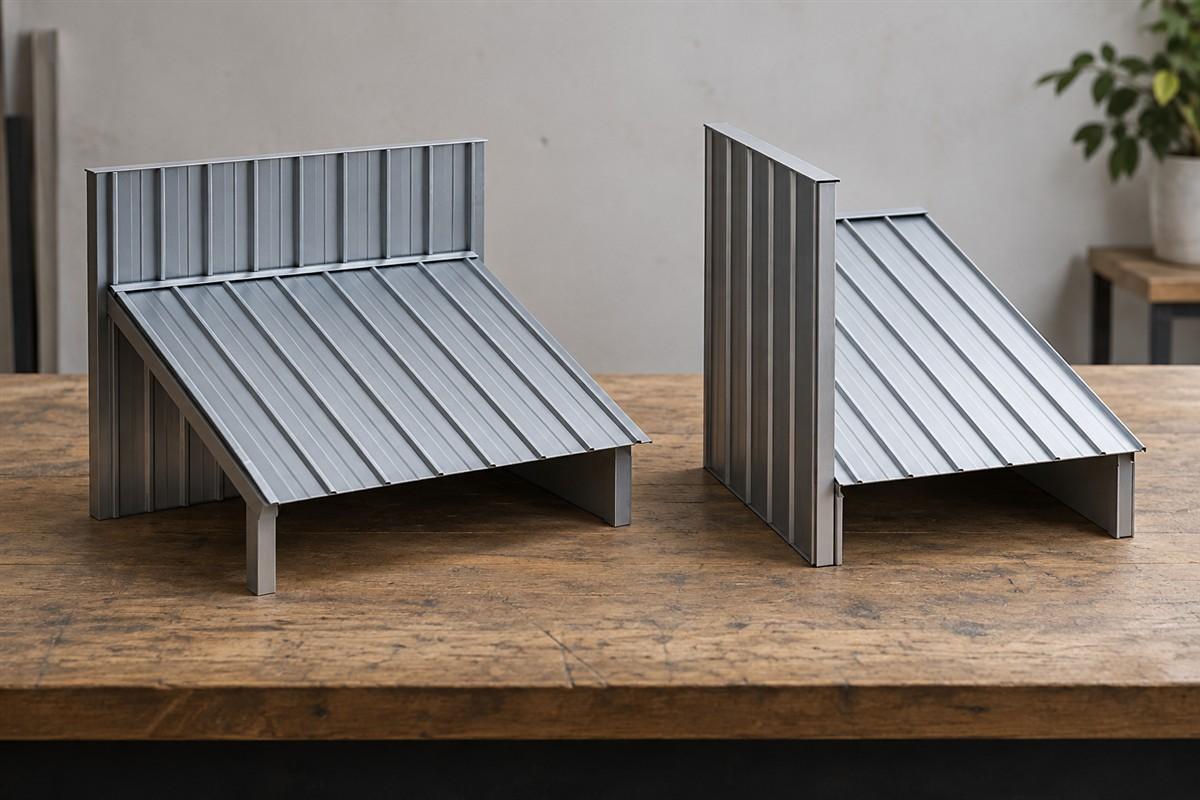
Find the roof's downhill direction. A headwall junction crosses the upper ends of the roof panels. A sidewall junction runs beside their long sides. Use that relationship before trying to name the loose trim.
Flashing is shaped material that manages water where building surfaces meet. A junction is that meeting place. On a ribbed metal roof, the ribs are the raised ridges running along the panels.
Use suitable fall protection for roof work and hire a pro if safe access is difficult.
This comparison identifies the junction and the information needed for a part choice. It does not give a fastening or sealing recipe.
Read the roof direction before the wall name
Stand where you can see the slope from the ground. Identify the low edge where water leaves the roof. The upper end is the opposite end of that slope.
Draw a rectangle for the roof on paper. Add an arrow toward the low edge. Then draw the wall that meets it. Is the wall across the upper edge, or beside the route downhill?
At a typical headwall, the panel ends meet the wall across the top of the slope. At a sidewall, the wall lies beside the slope. The distinction comes from the roof-to-wall relationship.
Do not use “sidewall of the building” to decide the flashing name. A lean-to against a building's side wall can form a headwall junction. The building face and the roof junction use different naming ideas.
If the roof changes direction near a corner, split the sketch into separate junctions. Do not assign one name to every piece around the whole corner.
Identify the junction in five steps
- Take a wide photograph. Include the wall, roof slope, and low edge. A close picture of trim alone hides the orientation.
- Mark the downhill route on your paper sketch. Use the visible roof shape. If that direction is unclear, ask the roofer to confirm it.
- Find the panel ends or long sides. Note which one meets the wall. Do not lift the flashing to expose a hidden edge.
- Name the junction. Write headwall across the upper panel ends or sidewall beside the slope. Keep uncertain areas marked uncertain.
- Locate the matching installation detail. Search the actual panel maker's website for that profile's installation guide. Check the roof-to-wall pages and compare the drawn arrangement.
A guide may use endwall for a headwall roof junction. Confirm that its drawing crosses the upper panel ends. Do not confuse it with a building's end wall merely because the same word appears.
Use a junction-orientation comparison
Fill the final column using your sketch and photographs. This table helps explain the part request without prescribing its bends.
| Question | Headwall junction | Sidewall junction | Your observation |
|---|---|---|---|
| Where is the wall? | Across the roof's upper end | Along a side of the slope | Across, beside, or unclear |
| Which panel edge meets it? | Upper short ends | Long side | Photo showing the relationship |
| What does the guide show? | Endwall or headwall detail | Sidewall detail | Page and exact detail label |
| What changes at the corner? | May meet another edge condition | May meet another edge condition | Separate corner photo |
| What must match the part? | Actual junction and panel detail | Actual junction and panel detail | Shape and missing information |
| Is the name enough? | No | No | What remains to confirm |
Keep the table with your roof sketch. The most useful entry is the photo showing which edge meets the wall.
Compare the part drawing with the actual joint
A profile is the shape seen at the end of a panel or trim piece. Ask for the complete flashing profile drawing when considering a candidate. Compare it with the roof-to-wall detail for your actual panel.
Identify the part of the flashing along the wall and the part facing the roof. Look for any folded edge. A hem is a folded-back sheet-metal edge. Record its position if it appears in the candidate drawing.
Do not straighten old flashing to measure its shape. A detached spare can be sketched and measured without changing its bends. Label those readings as existing-part measurements. They are not instructions for making a new piece.
The building's drawings or panel maker's installation instructions decide overlaps and fastening patterns. Use the exact roof-to-wall detail for seal locations and assembly order too. There is no single overlap or bend that this comparison can prescribe for every junction.
Show the wall covering as well as the roof
Photograph the lower edge of the wall covering from a safe position. Note what is visible above the flashing. Do not assume the hidden wall layers from an outside view.
The installation detail needs to coordinate the roof flashing with the wall assembly. If the guide's wall material differs from yours, ask the roofer how the actual junction should be handled. Do not copy a detail for another covering because the trim looks similar.
For an older lean-to, use How to Inspect a Leaking Lean-To Roof Junction to gather the wall-edge and junction pictures. For a new addition, start with How to Plan a Lean-To on a Metal Building.
Avoid buying by a similar trim name
Door head trim is not automatically roof headwall flashing. Rake trim, which finishes a sloping outside roof edge, does not become sidewall flashing because it runs downhill. Name the location before comparing any loose bent strip.
This comparison makes no headwall or sidewall product recommendation. Keep the required flashing on your parts list until its exact shape and suitability are confirmed. Do not replace that unresolved line with another listed trim just to finish the list.
Your final note should identify the downhill direction, the panel edge meeting the wall, and the matching detail page. If those agree, you have a clear junction description. The next step is confirming the actual part against that detail.