How to Spot Overdriven Metal Roof Screws
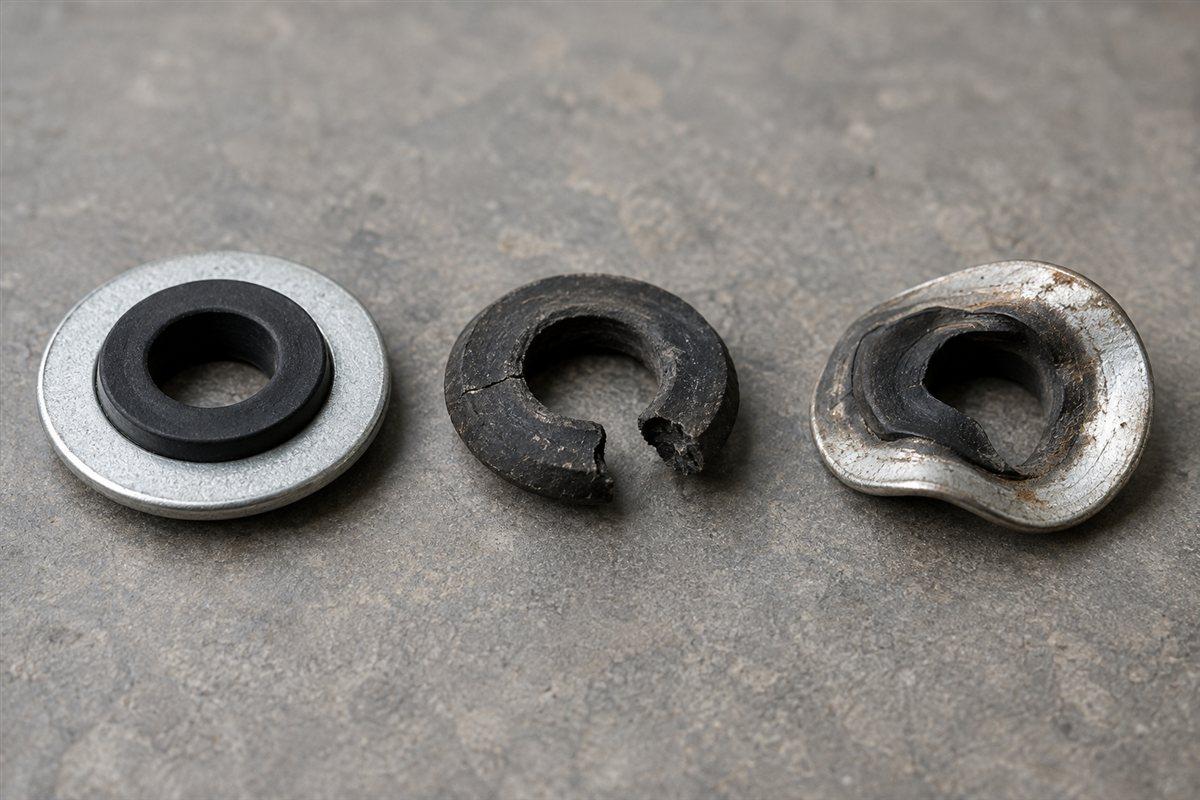
A washer squeezed badly out from under a roof screw is a warning sign. So is a dished metal washer or a dent around the screw. Compare what you see with the fastener's seating picture before making an adjustment.
Overdriven means driven too far. Underdriven means not driven far enough to seat properly. The sealing washer is the flexible seal beneath the screw head, often backed by a metal washer. Its visible condition gives you useful clues.
You can photograph those clues and sort the next actions. A washer that looks tidy does not prove the hidden screw connection is sound. A drip indoors also does not prove the nearest screw caused it.
Know the three views worth comparing
The fastener guide's correctly seated example shows an even washer against the panel. Underdriven examples show incomplete seating. Overdriven examples show excessive compression or deformation. Use the picture for your screw's washer style rather than copying a different seal's appearance.
A screw driven at an angle can leave uneven compression around the washer. One side may be squeezed while the opposite side has a gap. Write tilted in your notes instead of treating every uneven washer as simple overtightening.
Look at the surrounding sheet too. Is the panel dented? Is there visible rust or a torn edge near the hole? Those observations belong in the record even if the head itself looks normal.
For roof work, use suitable fall protection and hire a roofer if you cannot reach the screw safely.
Gather views before touching the driver
Use a phone camera, a notebook, and the installation sheet. A spare screw can help you understand the washer construction on the bench. Start with existing close photos or views taken safely during other work.
- Name the location. Write the roof section and a landmark visible from the ground. Avoid a note that only says bad screw.
- Take a wider view. Show the suspect screw and the surrounding sheet. Include a nearby seam or edge so the close-up can be located later.
- Take a top view. Show the washer's full outline. Look for split rubber, an uneven edge, or material squeezed beyond the metal backing.
- Take a low side view where safely accessible. Capture the washer's contact with the sheet. Do not lean over an edge to obtain the photo.
- Photograph the panel around it. Show dents, rust, and tears separately. Keep the screw in the frame if possible.
- Compare with the maker's seating illustration. Note the visible difference in plain words. Leave hidden conditions unconfirmed.
Do not remove a whole row of screws for inspection. Keep the observation job separate from the repair job.
Use the visible-condition photo checklist
This checklist pairs each photo with a question. It helps prevent a close-up from becoming a diagnosis by itself.
| Photo or observation | Question to answer | Next action |
|---|---|---|
| Washer outline from above | Is rubber split, displaced, or heavily squeezed out? | Compare with the seating picture; plan replacement if damaged |
| Side view of washer | Is there a visible gap beneath the seal? | Check whether controlled reseating is suitable |
| Head and washer alignment | Is the screw tilted relative to the sheet? | Inspect the hole during the repair |
| Panel around the screw | Is metal dented, torn, or rusted? | Include panel damage in the repair scope |
| Wider roof view | Where is this screw relative to seams and edges? | Keep the location with the close-up |
| Indoor stain photo | Is the stain near the same roof section? | Treat it as a location clue, not proof of entry |
| Sample or pack photo | Can the actual screw type be identified? | Resolve missing part details before replacement |
Use descriptions such as gap visible or rubber split. Avoid marking a connection safe from a photograph. If the roof has many damaged washers, make a location map rather than repeatedly adjusting screws at random.
Choose between reseating and replacement
For a clearly underdriven screw with an intact washer and a sound connection, controlled seating may be possible. Use the specified driver tool and follow the fastener's seating instructions. Keep the tool square to the sheet and check the washer as you work.
A screw gun is a driver made to control screw depth. A depth stop limits how far the tool drives. An impact driver delivers repeated twisting blows; it can make fine seating control harder. Use the tool the fastener instructions call for.
Do not prescribe one setting for every screw. Your building's drawings or the panel maker's installation instructions decide driving torque and fastening patterns. The fastener guide explains its washer's final seating appearance.
If the seal is split or badly crushed, backing the screw out does not turn it into a fresh washer. Replace a damaged screw-and-washer assembly using the correct type. Keep the removed sample for identification rather than returning it to the roof.
During replacement, inspect the hole and receiving material. A screw that spins without gripping needs a different repair decision. Enlarged holes, torn sheets, or damaged supports need the panel maker's repair guidance and sometimes a roofer's help.
Finish the repair decision with the right page
Use How to Fix Leaking Metal Roof Screws for finding the suspect screw, checking the hole, and replacing the assembly. That page covers the repair sequence; this checklist helps you describe the visible seating problem first.
The listed Self-drilling roof screws with sealing washer, #12 x 1-1/2 in is a pending roof-screw candidate with a sealing washer. It is not an established damaged-hole repair screw. Compare its confirmed attributes with the required replacement before choosing it.
For the count after the repair scope and fastening requirements are settled, use How to count screws and closures for a metal roof. Keep your location map with that list. A useful finished record shows the observation, the action taken, and any condition still needing attention.