R-Panel vs PBR: How to Tell Them Apart
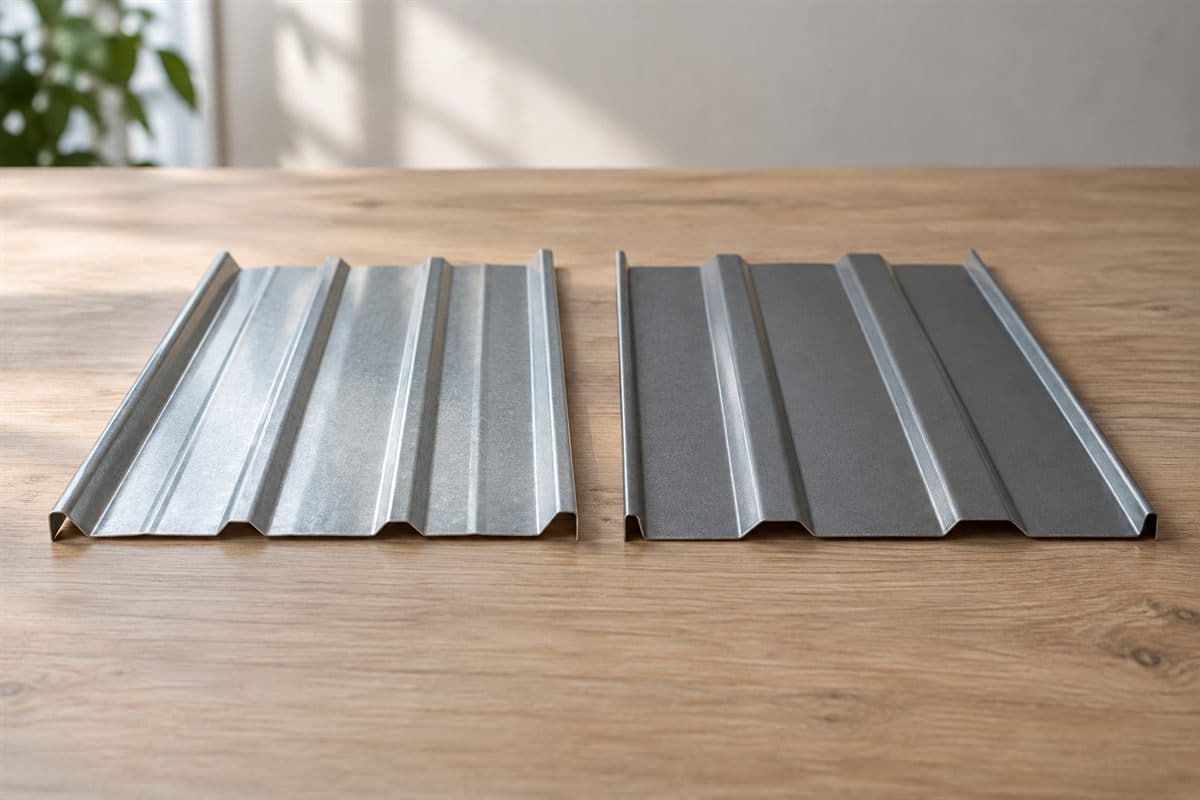
The easiest place to tell R-panel and PBR apart is the long side edge. PBR has an extra flat extension called a purlin bearing leg. The compared R-panel shape lacks that extension. Their large ribs can look much alike.
That tells you what to inspect. It does not prove two sheets fit together or establish their strength. For replacement work, compare both edges and the rest of the shape before choosing a panel.
Know what the bearing leg looks like
PBR means purlin bearing rib. A purlin is a framing member supporting roof panels. The bearing leg is the flat piece extending beyond the rib at the underlapping edge. It sits on the support beneath the neighboring sheet's edge.
The underlap is the edge tucked below the next sheet. The side lap is the joint where their long edges overlap. Look at an end-view drawing to see that relationship clearly.
A profile is the panel's end shape. Its raised ridges are ribs. Follow the line of the sheet through the edge rib and toward its end. The extra flat extension is the feature you are looking for.
Do not confuse it with a crushed edge or a small folded lip. Compare the drawing with intact metal. If the edge is badly bent, leave its identity uncertain until you have a better sample.
For roof work, use suitable fall protection and hire a roofer if safe inspection is beyond your skills.
Compare loose samples at a table
A spare sheet or offcut, a leftover panel piece, lets you inspect the ends without disturbing a roof. Use gloves, a ruler, tape measure, pencil, and phone camera.
Put the outdoor face upward and the panel end toward you. Mark the viewpoint on paper. Keep it the same while photographing both edges. Flipping the sheet halfway through can make left and right notes confusing.
Search old receipts, panel wrapping, or stored building papers for the maker and profile name. On the maker's website, look for that panel's installation guide and profile drawing. Downloads and technical information are common places to start.
If the old barn has no records, your end photos and measurements can start the search. Ask for candidate drawings showing the whole sheet, including both side edges. A distant roof photo cannot show those bends well enough.
Fill in the edge and fit comparison table
This table helps you separate the visible difference from the information needed for a replacement.
| Feature | Compared R-panel | Compared PBR | Record for your sample |
|---|---|---|---|
| Main face | Raised ribs and flat areas | Similar rib arrangement | End photo and measured shape |
| Bearing leg | No matching added extension | Flat extension at underlap | Present, absent, damaged, or unclear |
| Long edges | Compare both actual bends | Compare both actual bends | Left and right sketches |
| Coverage | Read the exact product information | Read the exact product information | Keep separate from overall width |
| Intended use | Check the exact panel's guide | Check the exact panel's guide | Roof or wall application |
| Old-to-new fit | Compare the complete joint | Compare the complete joint | Matching edges or differences |
| Fastening | Use the roof's own requirements | Use the roof's own requirements | Instruction page for later work |
The extra leg identifies the compared PBR shape. It is not a reason to claim that every PBR is suitable for every roof. Product names and uses need checking against the exact panel information.
Work from the edge toward the middle
- Find the extension on the drawing. Start at the underlap rib and follow the metal outline to its end. Compare an R-panel drawing with a PBR drawing.
- Find the same feature on your sample. Take a straight end photo. Write unclear if damage hides the extension. Do not bend it into the shape you hope to find.
- Measure the large ribs. Measure center to center across neighboring large ribs. Record their height above the flat sheet too.
- Count the smaller ridges. Sketch the ridges between the large ribs. These help catch a misleading match based on one edge alone.
- Inspect the opposite edge. Draw its bends and any folded return. Both sides must work with the neighboring sheets.
- Compare the candidate's intended use. Read its installation guide for roof or wall use. If the old panel's identity remains uncertain, send your sample information for help before choosing a replacement.
Your building's drawings or the panel maker's installation instructions decide support distances, overlaps, fastening patterns, and wind or snow requirements. This comparison gives no strength values.
Choose a product candidate with enough information
Use 26-gauge PBR panel for the listed PBR candidate and 26-gauge R-panel for the R-panel candidate. Compare their profile information with the sample first. Do not select by the shortest product name on an old receipt.
Then record the required gauge, the panel thickness designation, along with finish, cut length, and quantity. Keep these as separate fields. A match in rib shape does not tell you the required thickness.
If the seller's drawing leaves an edge out, ask for a complete drawing. If two drawings disagree, compare them with the sample rather than picking the more familiar name. Clear edge evidence is worth collecting before the parts list grows.
Avoid the common identification shortcuts
A bent bearing leg can look absent. A photo can hide a flat extension behind the rib. Overall sheet width can also be mistaken for coverage after overlapping. Label these observations separately.
For a full photo kit and edge trace, use How to Match Old Metal Roof Panels. Once the profile is settled, continue with How to measure and order metal panels by length for lengths and counts.
Your finished note should say which feature identifies the sample and whether the candidate's other edges match. If the only result is looks like PBR, collect the missing views before choosing the replacement.