How to Install Ridge Cap on a Metal Roof
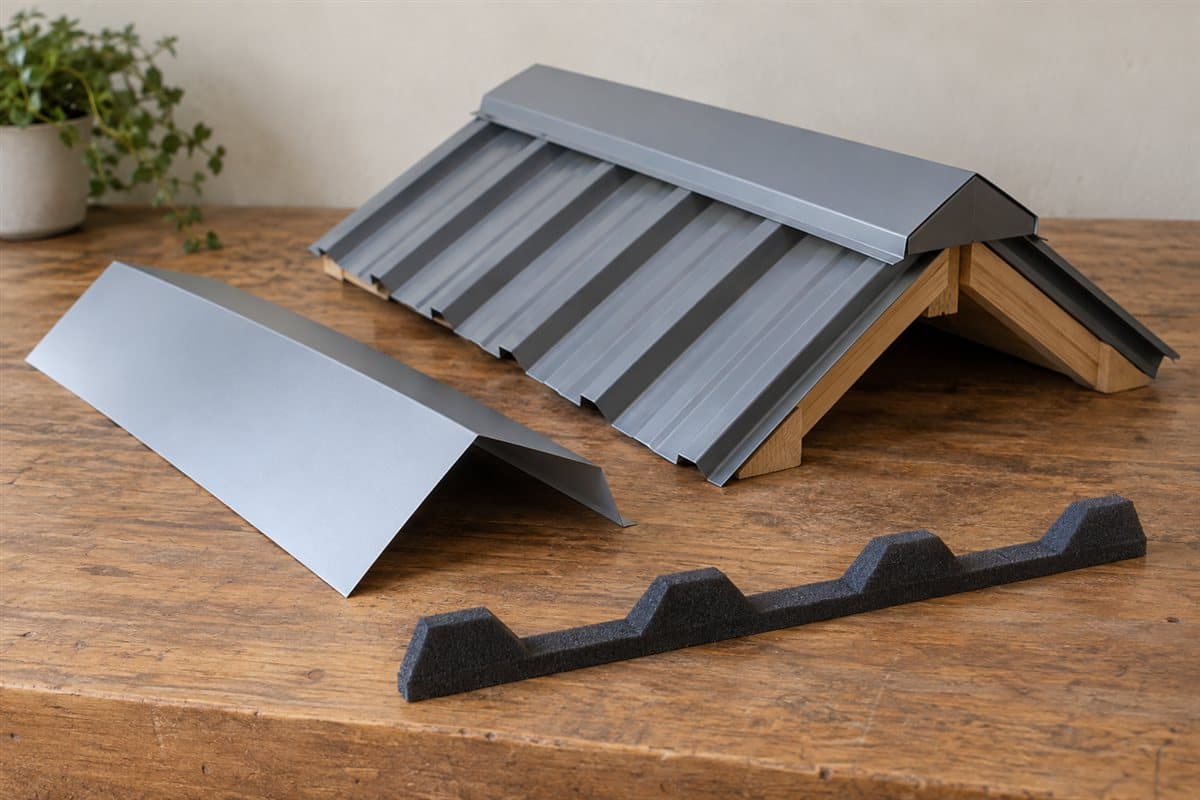
A ridge cap covers the peak where two roof slopes meet. Before fastening it, settle two things: the cap must fit the roof, and the material beneath it must match the ridge arrangement. Solid closures and ridge ventilation serve different purposes.
A closure is a shaped strip that fills gaps against the panel ribs. Ribs are the raised ridges in the sheet. A vented ridge uses a system that allows air movement while protecting the opening. Do not replace that system with solid foam.
For roof work, use suitable fall protection and hire a roofer if you cannot work safely.
Identify the peak you are finishing
Find the panel maker and profile, the shape seen at the panel's end. Look for the ridge section in its installation guide. Search its website's downloads or technical pages using the exact panel name.
On an older barn, begin with receipts, spare panels, or existing close photos. Use How to Match Old Metal Roof Panels if the panel name remains unclear. A cap that resembles the old one does not identify all the materials beneath it.
Record whether the current ridge is vented or solid. If the cap hides that information, keep it unknown until a roofer can inspect. Do not cut an opening to find out or make a vent by removing closures.
Record the roof pitch, its slope, from existing records or a measurement taken safely. Pitch helps identify the cap shape. Your building's drawings or the panel maker's installation instructions decide acceptable slope and ridge-opening dimensions.
Check the cap, panel, and closure as a group
Compare the cap's end shape with the two roof slopes. Look at its legs, the flat portions on either side of the bend. Check whether the guide shows an ordinary straight cap or a formed cap shaped around ribs.
Compare the closure's shape with a loose panel sample. The closure face above a panel must follow that panel's top shape. Keep the type and orientation with the ridge location. Use Inside vs Outside Foam Closures: Which Do You Need? if those faces are confusing.
Gather a tape measure, pencil, straightedge, gloves, eye protection, and metal-cutting snips. Snips are hand shears for thin sheet. Add the specified driver and sealing products. A chalk line, a string that leaves a straight mark, can help with layout if the finish instructions permit it.
Keep the roof's ridge length separate from joint allowances. Use safely collected measurements. Your building's drawings or the panel maker's installation instructions decide overlaps and any required end treatment.
Fit and attach an exposed-fastener ridge cap
These steps describe a conventional cap over ribbed panels with visible fasteners. A different ridge system can use a different assembly order. Use the matching guide.
- Check the work below the cap. Confirm the panels and required edge trim are ready for the ridge stage. Resolve torn panel ends or loose material before covering them.
- Fit a loose cap piece over the peak. Center it as the drawing shows. Mark the lower edges lightly, using a marking method allowed for the finish.
- Extend the layout along the ridge. Keep both sides aligned with the matched cap arrangement. Check the fit at the far end before preparing every piece.
- Prepare the cap ends. Mark the guide's cut and fold arrangement on the loose parts. Cut on a bench and clear away chips and scrap.
- Clean the sealing surfaces. Follow the tape or sealant instructions for surface condition. Do not seal over loose dirt or old failed material.
- Place the required closures or vent components. Position them according to the correct ridge detail. Keep their shape seated against the panel without crushing it.
- Apply the specified joint seal. Put tape and sealant on the faces shown before the cap hides them. Do not add solid material across an intended air path.
- Set and fasten the cap. Use the specified fastener type and connection locations. Do not flatten the cap's peak by driving harder to pull down a poor fit.
- Join successive cap pieces. Prepare and seal each lap, the area where pieces overlap, as the guide shows. Maintain the layout and the intended end arrangement.
- Inspect both sides and both ends. Check alignment, closure contact, required seals, and any vent path. Remove loose metal chips before finishing.
Your building's drawings or the panel maker's installation instructions decide fastening patterns, driving torque, overlaps, ridge-opening dimensions, and wind or snow requirements. A cap photograph cannot establish these values.
Fill in the peak compatibility checklist
Complete one row for each roof ridge. This aid prevents an apparently matching cap from hiding an unresolved closure or vent choice.
| Peak question | Evidence to keep | Ready when |
|---|---|---|
| Which panel is underneath? | Profile name and end drawing | Actual panel matches the guide |
| What cap shape fits? | Pitch information and cap end drawing | Both sides fit the intended arrangement |
| Solid or vented ridge? | Matching ridge illustration and existing-condition note | The air-path requirement is known |
| Which closure face? | Sample beside panel end | Shape and orientation match |
| Where does sealing go? | Highlighted seal locations in the guide | Materials and contact faces are identified |
| How do ends finish? | Peak-end and rake-junction sketches | No end is left to guesswork |
| How are pieces joined? | Lap and fastener instructions | Joining requirements are available |
If you only know the ridge length, the checklist is unfinished. Length helps count pieces; it does not select the closure or cap shape.
Select parts without inventing a vent option
The listed Standard-pitch ridge cap and Over-4:12 ridge cap are cap families to compare. Foam closure strips for PBR and R-panel and Butyl tape sealant are relevant only when the matched detail uses those types. These entries await confirmation.
The catalog does not establish a vented ridge product. If your roof needs one, keep that requirement separate rather than substituting a listed foam closure. Confirm cap dimensions and bend details before selection.
For quantities after the arrangement is settled, use How to count screws and closures for a metal roof. For the adjoining sloping edge, use How to Install Rake Trim on a Metal Roof. Save the completed checklist with the ridge's parts list.