Inside vs Outside Foam Closures: Which Do You Need?
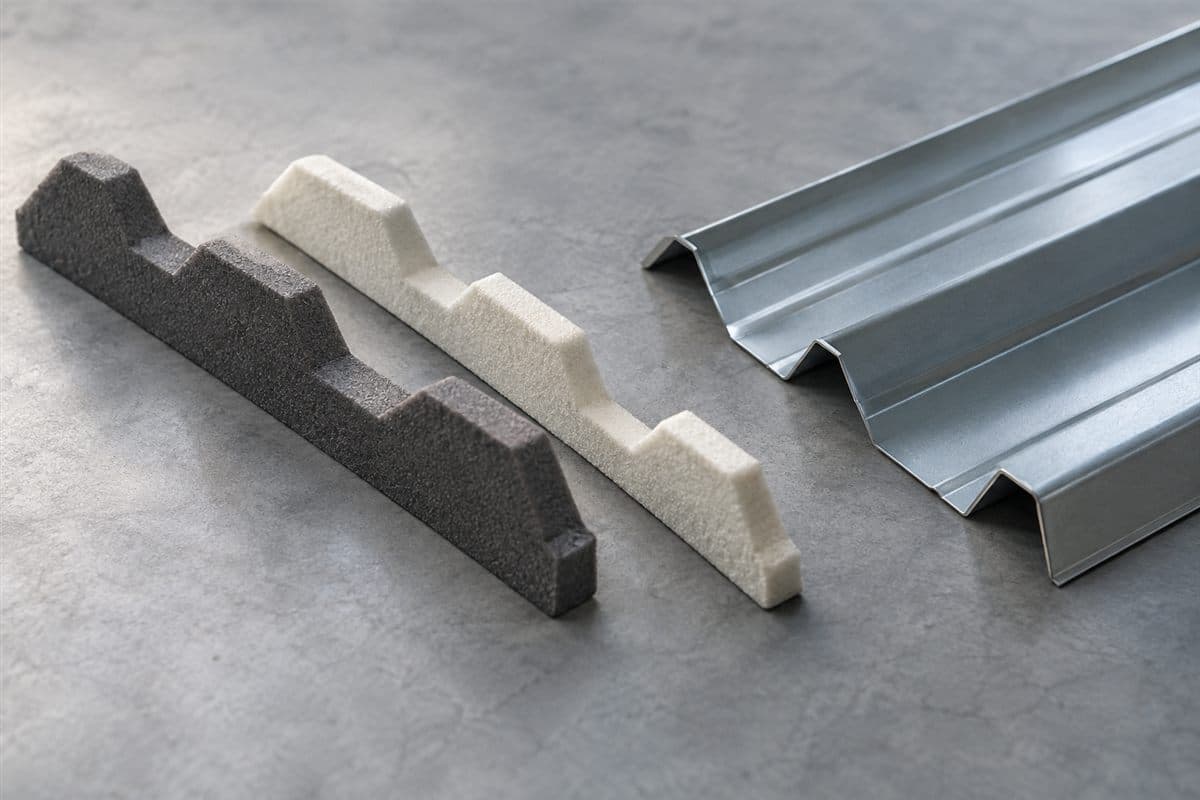
An inside foam closure fits underneath a ribbed panel. An outside closure fits over its upper face. The shaped side faces the metal in both cases. Choose by the panel face and rib shape, rather than by whether you are standing indoors or outdoors.
A foam closure is a shaped strip that fills gaps along the panel profile. The profile is the sheet's end shape. Its raised ridges are ribs. The strip must match those ribs and the smaller bends between them.
See which face the strip fits
An inside closure has raised foam shapes that fill the hollow spaces beneath the panel ribs. Its shaped side faces upward into the underside of the sheet. Its flatter side faces the surface below.
An outside closure has recesses that fit over the raised ribs on the panel's upper face. Its shaped side faces downward toward the metal. Its flatter side faces the covering piece above.
These descriptions help you identify loose parts. The panel's installation guide shows where each type belongs on the roof. Do not choose an outside closure simply because the work is outdoors.
For roof work, use suitable fall protection and hire a roofer if you cannot reach the junction safely.
Bring the comparison to a bench
Find a spare panel or offcut, a leftover piece of sheet. Use a strip still in its packaging if possible. Old loose foam can be crushed or stretched, which makes comparison harder.
Gather gloves, a ruler, tape measure, pencil, notebook, and phone camera. Keep the adhesive backing attached while comparing parts. You can check the shape without sticking the strip down.
Place the panel with its outdoor face upward. Mark that face on paper beside it. Keep the same viewpoint while testing the two closure shapes.
If you know the panel maker, search its website for the exact panel's installation guide. Look at the edge or ridge drawing showing the closure. A ridge is the high meeting line of roof slopes. If the building has no drawings, the panel guide is a useful place to start.
If you do not know the panel, use How to Match Old Metal Roof Panels to collect end photos and measurements first. Buying foam before identifying the metal can leave you with a strip that almost fits.
Use the loose-sample orientation card
Keep this card with photos of the panel and foam. Fill in the last column before choosing the strip.
| Check | Inside closure | Outside closure | Your note |
|---|---|---|---|
| Panel face | Underside | Upper outdoor face | Which face needs filling |
| Shaped face | Up into hollow ribs | Down over raised ribs | Photo of the loose fit |
| Flatter face | Toward the surface below | Toward the covering piece above | Neighboring part identified |
| Rib match | Peaks fill underside spaces | Recesses follow upper ribs | Large and small features align |
| Roof location | Read the panel guide | Read the panel guide | Edge or junction named |
| Attachment | Check strip instructions | Check strip instructions | Adhesive and sealant needs |
| Quantity | Count its required locations | Count its required locations | Separate total for each type |
The card identifies orientation. It gives no fastening spacing, overlap, or installation dimensions.
Check the candidate along its whole length
- Confirm the panel shape. Compare its end photo with the closure's named profile. A broad label such as ribbed metal is not enough.
- Place the strip loosely. For an inside strip, compare underneath the panel end. For an outside strip, compare over the upper face. Keep hands away from sharp metal.
- Line up the first large rib. Then inspect the remaining ribs across the sample. Do not judge fit from one foam peak alone.
- Check the smaller features. Look for gaps around minor ridges and bends. Photograph mismatches instead of pressing harder to hide them.
- Keep the foam relaxed. Do not stretch or twist it until the peaks line up. Choose a strip shaped for the actual panel.
- Read the package. Record inside or outside, profile name, strip length, and attachment method. Keep the package with your matching photo.
- List both types separately if needed. Give each line its location and quantity. That prevents an unlabeled total of foam strips.
Measure a loose strip along its length if you need to describe it. Record the units. Existing strip measurements identify a part; they do not decide where it should be placed.
Choose the closure and any separate sealant
Foam closure strips for PBR and R-panel covers inside and outside strips for the listed PBR and R-panel families. Compare the actual shape before choosing a strip. A family name alone cannot establish fit with an old panel.
For the listed 26-gauge PBR panel, keep the panel profile beside the closure selection. If the old sheet might be R-panel, R-Panel vs PBR: How to Tell Them Apart helps identify its edge features.
Some joints also need sealant. A sealant is material used to seal a joint. Keep it on a separate line when required. Do not assume the foam package includes tape or that adhesive backing replaces all sealing steps.
Follow the strip's instructions for attachment and the panel guide for placement. Your building's drawings or the panel maker's installation instructions decide fastening patterns and overlap dimensions.
Leave planned airflow open
A roof gap may be part of ventilation, the planned movement of air. Do not fill every opening just because foam fits into it. Check the roof's ventilation arrangement before changing a ridge or other vented area.
Call a roofer if you cannot tell whether the opening is intentional. That question is different from identifying a loose closure's upper or lower face.
Common mistakes include flipping the sample during comparison, stretching foam to fit, and combining both types in one count. After shape and locations are clear, use How to count screws and closures for a metal roof. Your finished line should name the panel, closure orientation, and place it belongs.