Self-Drilling vs Self-Tapping: How to Tell Them Apart
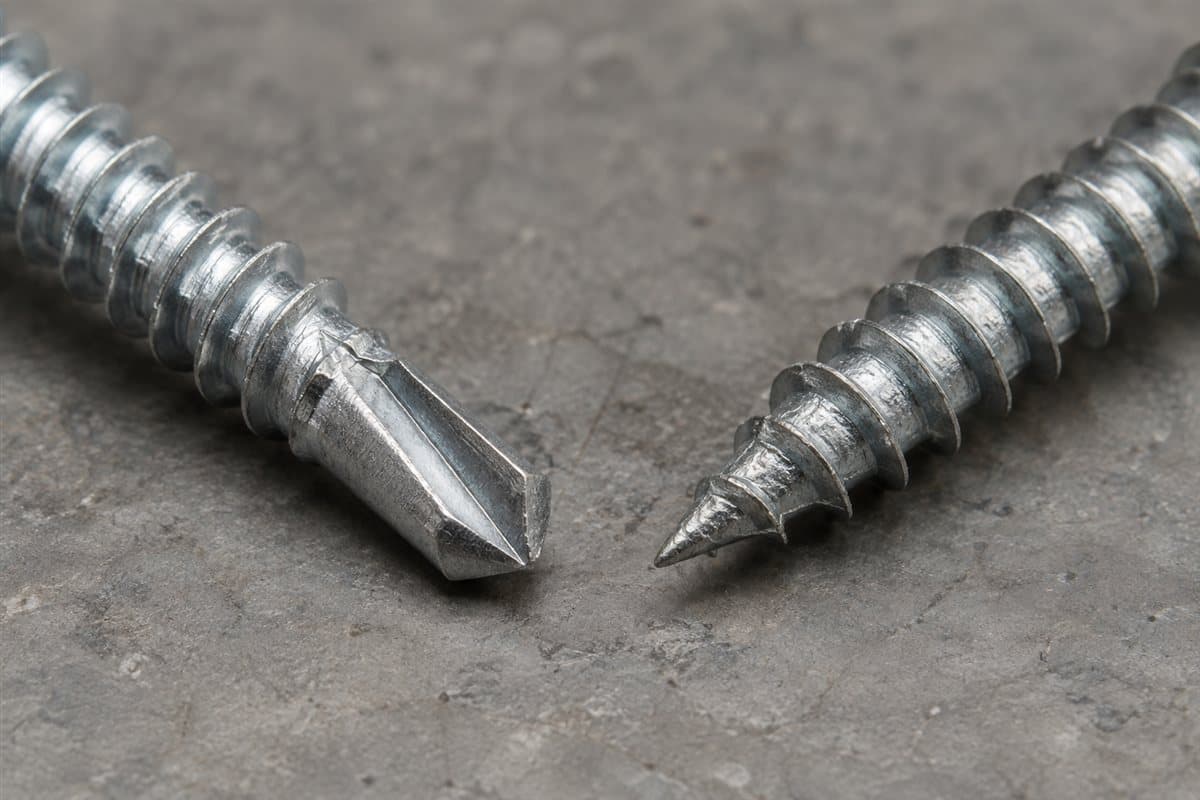
Look at the tip before you look at the head. A self-drilling screw has a small drill-shaped point with cutting edges. A sharp-point screw lacks that little drill bit. The words on the pack need checking too.
Self-tapping means the screw makes its own mating threads in the receiving material. Self-drilling adds the ability to make the hole with its drill point. A self-drilling screw also taps. The terms overlap, which explains some confusing shelf labels.
You can sort loose screws at a table. The next decision is whether a particular screw fits your panel and support. A recognizable tip helps identify a type; it does not answer that whole question.
Start with a loose sample and its label
Gather a spare screw, its pack if available, a phone camera, and a magnifying glass. Add a piece of plain paper for notes. Keep screws from different bags separate.
Use a spare rather than removing a working roof screw just to identify it. If your only sample is from a previous repair, write where it came from. An old screw shows what was used, not necessarily what should have been used.
Find any part number on the bag or old receipt. Search the maker's website for that part's technical sheet. Compare the illustrated point with the screw on the table. Read the stated use, not just the largest words on the pack.
Missing records are common with older barns. Take clear photographs of the whole screw, the tip, and the threads. Keep those photos together when asking someone to identify it.
Examine the point in a useful order
- Place the screw sideways on the paper. Keep the point visible and the screw still. Take one close photo without your fingers hiding the tip.
- Look for cutting grooves. On a drill point, grooves and cutting faces resemble the end of a small drill bit. Turn the loose screw to see another side.
- Look for a simple sharp point. Record sharp point if the end tapers without visible drill-bit cutting faces. Do not rename it self-drilling because it is pointed.
- Read the stated receiving material. The substrate is the material the screw threads grip. Look for wood or metal use in the technical sheet.
- Read the hole instructions. A non-drilling tapping screw used in metal may need a prepared hole. Follow its instructions; do not invent a hole size.
- Compare the whole part description. Check the point, thread, length, head, and washer together. If one field is missing, keep the identification unfinished.
For roof access, use suitable fall protection and hire a roofer if you cannot inspect safely.
Keep this tip identification card beside the samples
The card separates observations from decisions. Fill in a fresh copy for each sample instead of grouping every silver screw together.
| Card field | What to write | What it tells you |
|---|---|---|
| Tip shape | Drill-shaped, sharp, damaged, or unclear | The visible starting clue |
| Cutting grooves | Visible on which sides, or not visible | Evidence for a drill point |
| Pack wording | Copy the type exactly | How the part is described |
| Stated material | Wood, metal, or missing | Intended receiving material |
| Hole preparation | Instruction page or missing | Whether preparation is specified |
| Full identity | Part number plus complete label | A repeatable way to find the same item |
| Unfinished question | One specific missing field | What needs answering before selection |
Add a second line headed terminology. Write: tapping makes threads; drilling makes the hole. That short distinction is more useful than deciding the two words are opposites.
For example, a pack might call its screw self-tapping while its drawing shows a drill point. Treat that as a reason to read the detailed part description. Do not discard the drawing or assume the broad pack heading tells the whole story.
Match the screw to the actual connection
Metal roof panels can be attached to wood or steel supports. Sharp-point wood fasteners generally have coarser threads than metal-to-metal fasteners. Coarser means more space between neighboring threads. Steel fastening also needs a drill point suited to the receiving metal.
First identify whether the screw joins a panel to a support or joins overlapping thin sheets. An overlap, also called a lap, is where one sheet covers another. These jobs should have separate lines on your parts list. Use Metal Roof Screws for Wood vs Steel: How to Choose to identify the receiving support.
Next, find the panel's installation guide using its profile name. A profile is the shape seen at the panel's end. If that name is unknown, use How to Match Old Metal Roof Panels to collect the identification views.
Your building's drawings or the panel maker's installation instructions decide fastening patterns, required penetration, and driving torque. Drill capacity comes from the fastener's technical sheet. Neither the word metal nor a pointed tip supplies those answers.
Avoid the shortcuts that mix up the types
Do not identify a screw from its head color. Do not use head size as proof of thread size. Keep damaged tips marked unclear; a worn end can hide the feature you need.
Avoid testing unknown screws by driving them into the building. Identify the part first. A successful attempt to make a hole does not establish the intended use of that connection.
The listed Self-drilling roof screws with sealing washer, #12 x 1-1/2 in is a self-drilling roof screw with a sealing washer. Its pending entry does not establish every missing technical attribute. Compare confirmed details with your required screw before selecting it.
Continue with How to Read Metal Roof Screw Sizes for the size fields. For quantities after the screw type and fastening pattern are settled, use How to count screws and closures for a metal roof.